MonkePanel: Virtual Machine Configuration Guide
Zookeeper, our free tool, can set up and manage GPU-PV virtual machines for you. Follow this guide if you would rather do it by hand, or if Zookeeper does not work out on your PC.
00 System Requirements & Resource Planning
To reliably operate 4 concurrent virtual machines running Counter-Strike 2 alongside the host operating system, your hardware must meet the validated baseline below:
The minimum official system requirement for Counter-Strike 2 is 6 GB RAM. In a virtualized environment, allocating at least 6 GB per VM ensures uninterrupted execution without out-of-memory crashes.
CS2 requires approximately ~85 GB of free storage. In a virtualized setup, additional headroom is required for the OS VHDX image (~15 GB) and swap/page files.
01 Installing Hyper-V & Virtual Machine Platform
Hyper-V is Microsoft's native Type-1 hypervisor. Follow these steps to enable virtualization features directly inside Windows:
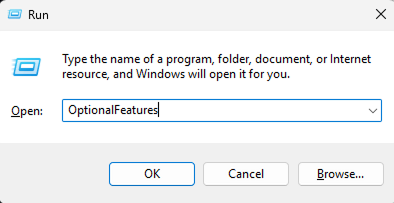
Press Win + R on your keyboard, type OptionalFeatures in the input field, and press Enter or click OK.
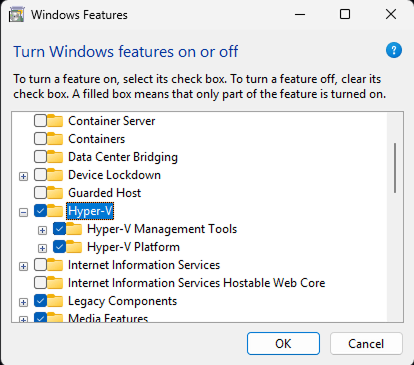
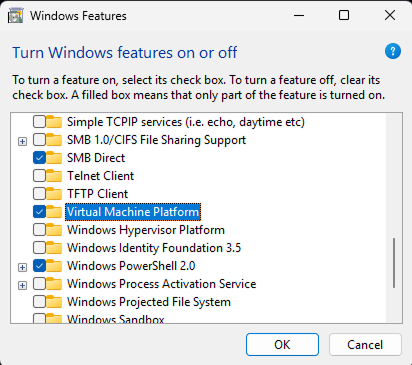
In the Turn Windows features on or off dialog, locate and check the following checkboxes:
- Hyper-V (ensure both Hyper-V Management Tools and Hyper-V Platform are checked)
- Virtual Machine Platform
Click OK and allow Windows to install the required packages. Restart your PC when prompted.
If Hyper-V does not appear in your Windows Features list (typical on Windows 11 Home editions):
- Download the Hyper-V batch script.
- Right-click the downloaded
.batfile and select Run as administrator.
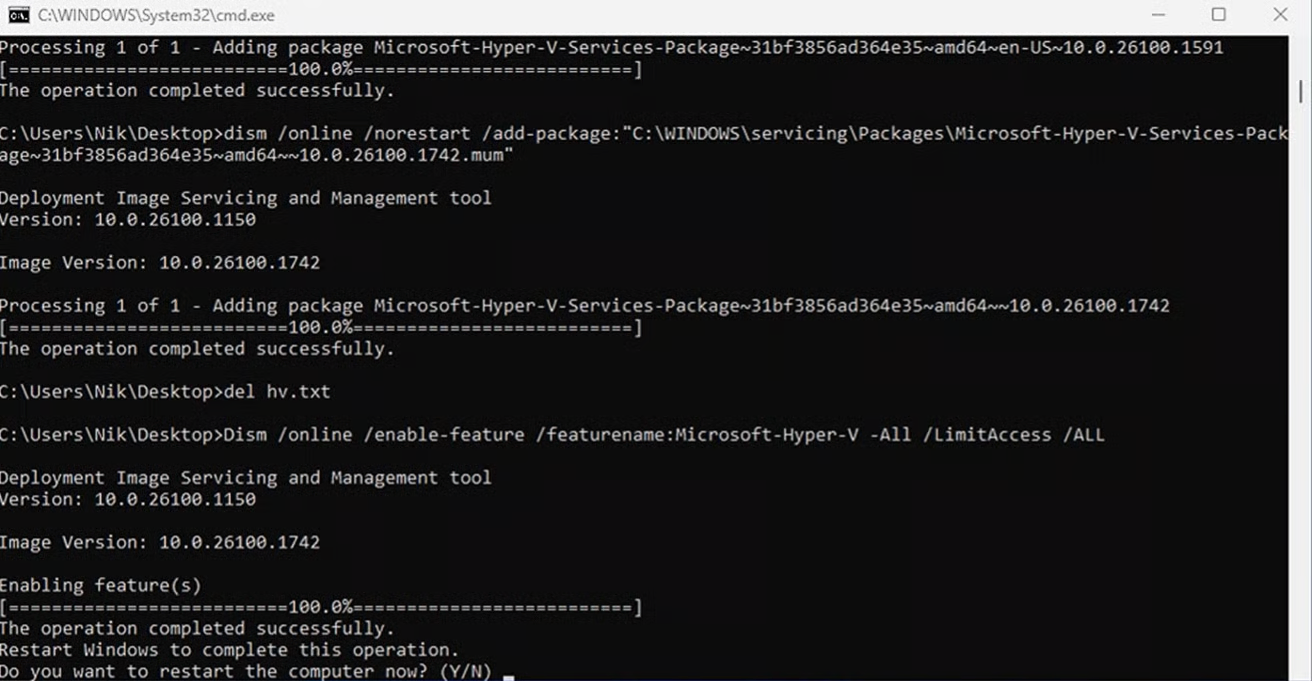
Upon completion, press Y in the console to restart your system.
After rebooting, press Win + S and search for Hyper-V Manager. If it appears in the results, virtualization is properly installed.
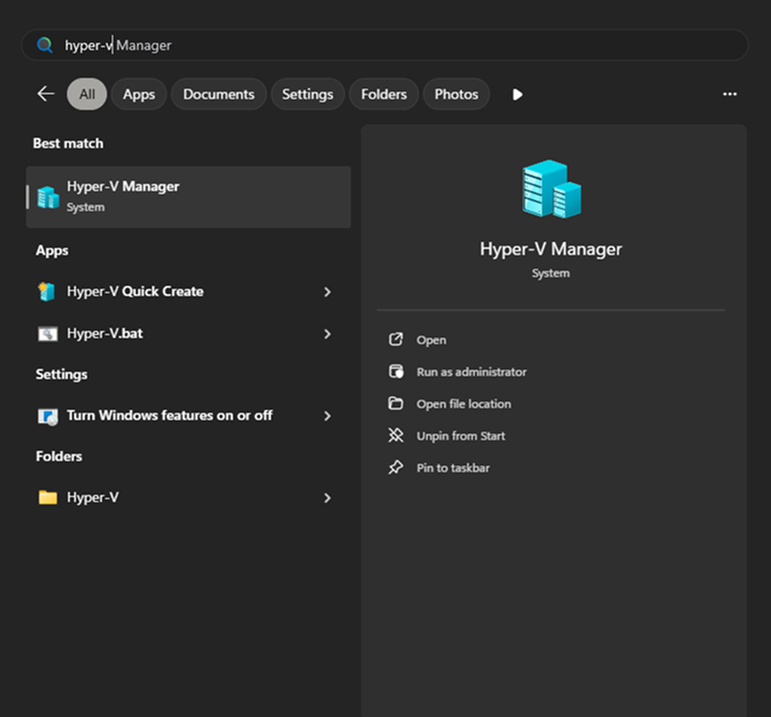
02 Hyper-V Host & Virtual Switch Setup
Properly configure the hypervisor service, disable Enhanced Session mode (critical for panel macro/click automation), and bridge an external network switch.
Open Hyper-V Manager. If your local computer name is missing beneath the "Hyper-V Manager" header, the Virtual Machine Management Service (VMMS) is currently stopped.
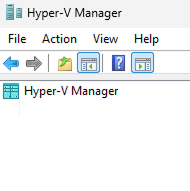
To start the service, launch Windows PowerShell as Administrator and run:
Get-Service -ComputerName "$env:COMPUTERNAME" -Name "vmms" | Start-ServiceOnce started, your PC (e.g. DESKTOP-MLVRSW9) will display in the left navigation pane:
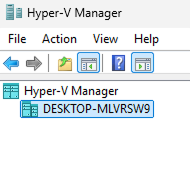
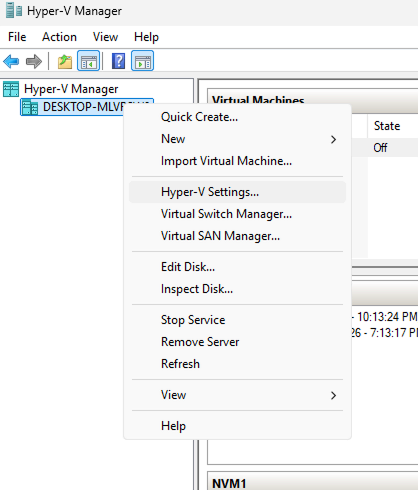
Right-click your host PC name in Hyper-V Manager and click Hyper-V Settings...
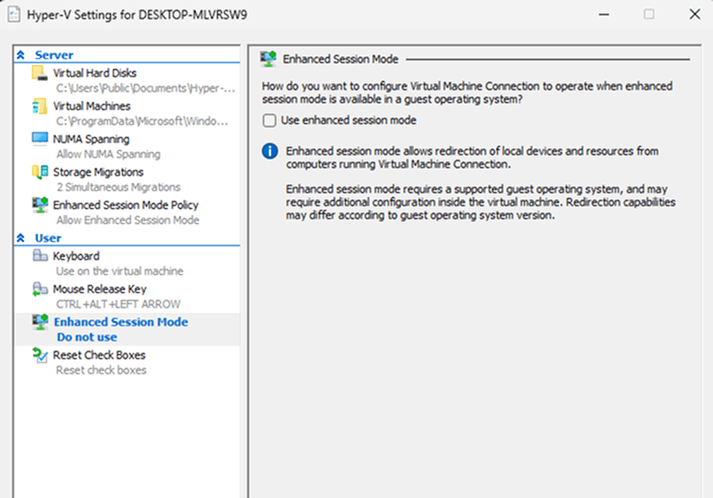
In the settings window, select Enhanced Session Mode (under User) and uncheck "Use enhanced session mode". Click Apply.
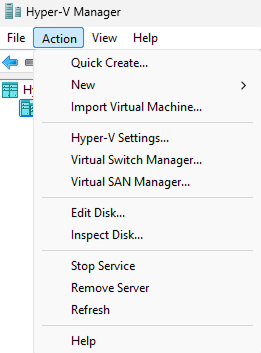
In the right-hand Actions pane of Hyper-V Manager, click Virtual Switch Manager...
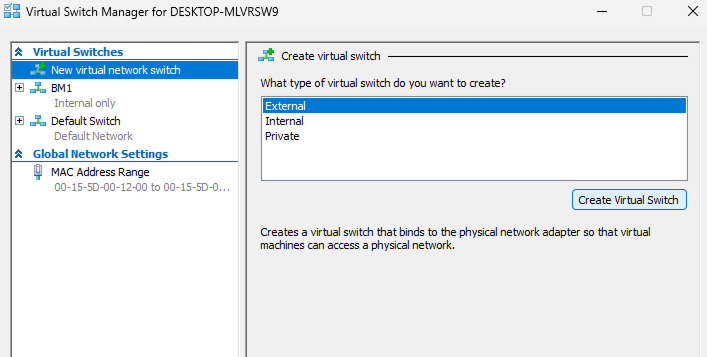
Select New virtual network switch, choose External as the switch type, and click Create Virtual Switch.
Configure the virtual switch settings:
- Name: Specify an identifier (e.g.,
exampleorVM_Switch). - Connection type: Select External network and pick your active physical network adapter (e.g. Realtek PCIe GbE or Intel Ethernet/Wi-Fi).
- Crucial: Check "Allow management operating system to share this network adapter" so your host retains internet access.
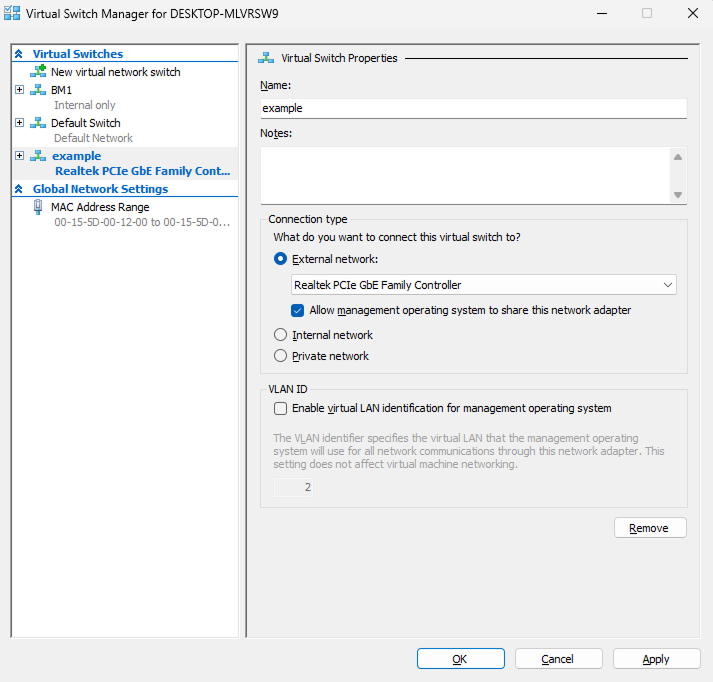
Click Apply, confirm any network momentary disconnect prompt, and click OK.
03 Creating the Virtual Machine
To run 4 farming accounts, you will create 4 VMs. Follow the walkthrough below to create the primary VM (subsequent VMs follow the exact same configuration parameters).
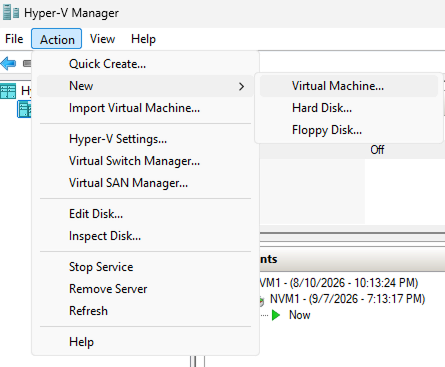
In Hyper-V Manager Actions menu, click New > Virtual Machine...
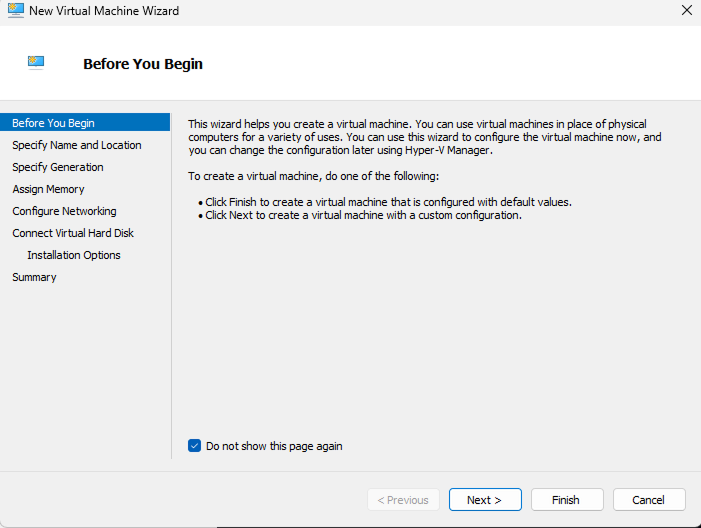
Click Next on the "Before You Begin" splash screen.
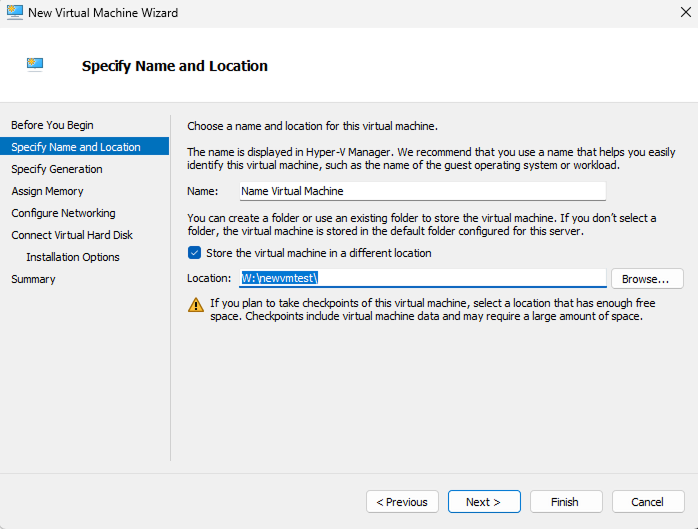
Enter a descriptive VM name (e.g. Name Virtual Machine or NVM1). Optionally check "Store the virtual machine in a different location" to place it on a fast NVMe partition (e.g. W:\newvmtest\). Click Next.
Select Generation 2. This enables modern 64-bit UEFI architecture, secure boot, and virtual TPM 2.0 required by Windows 11.
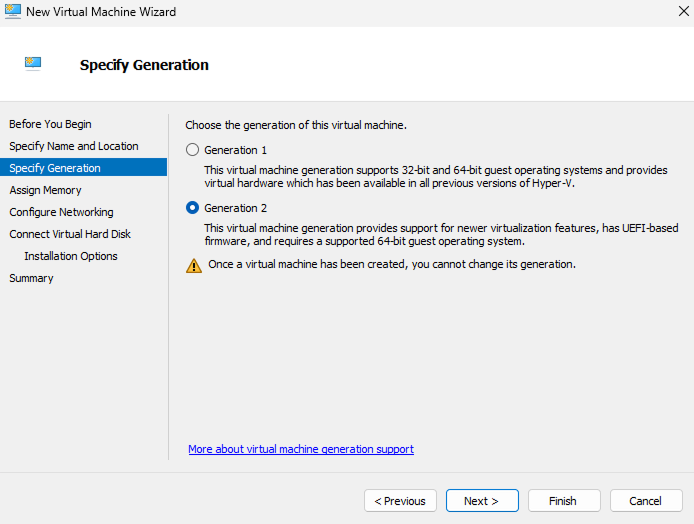
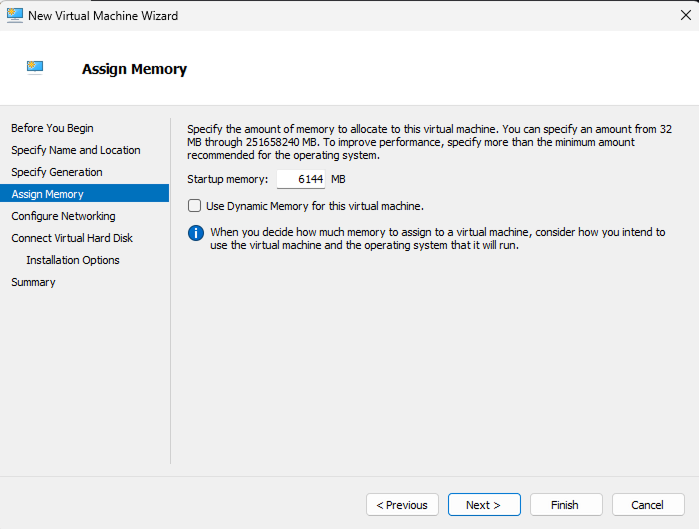
Set Startup memory to 6144 MB (6 GB). Uncheck "Use Dynamic Memory for this virtual machine" to prevent memory throttling during game loads. Click Next.
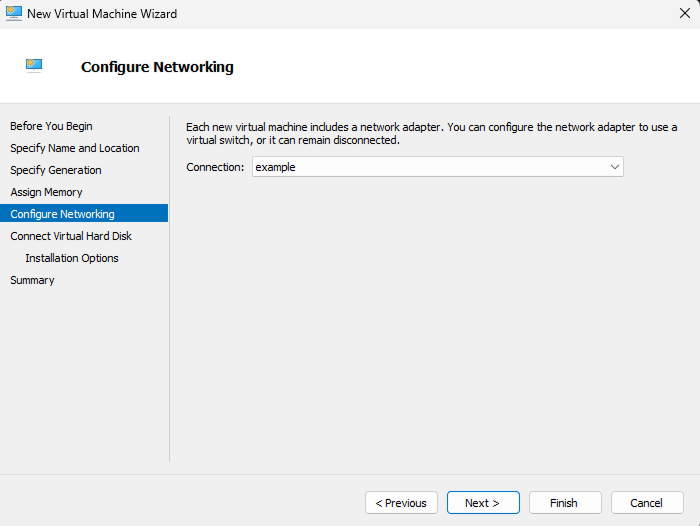
In the Connection drop-down, select the external virtual switch you created earlier (example). Click Next.
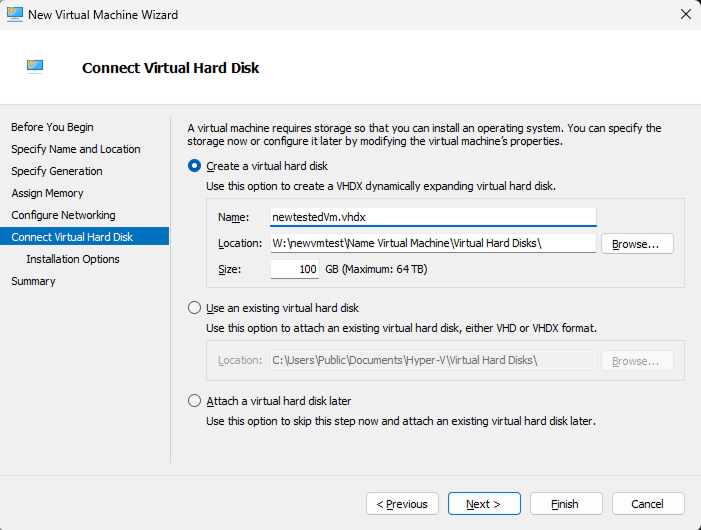
Select Create a virtual hard disk, set Size to 100 GB, and click Next.
Select Install an operating system from a bootable image file (.iso). Click Browse... and select the downloaded ISO (_22631.4602_Update_14_by_Ghost_Spectre.iso ↗). Click Next, then Finish.
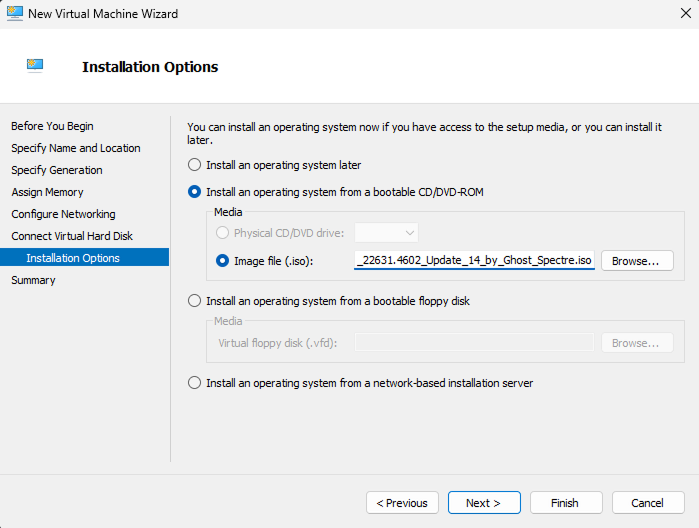
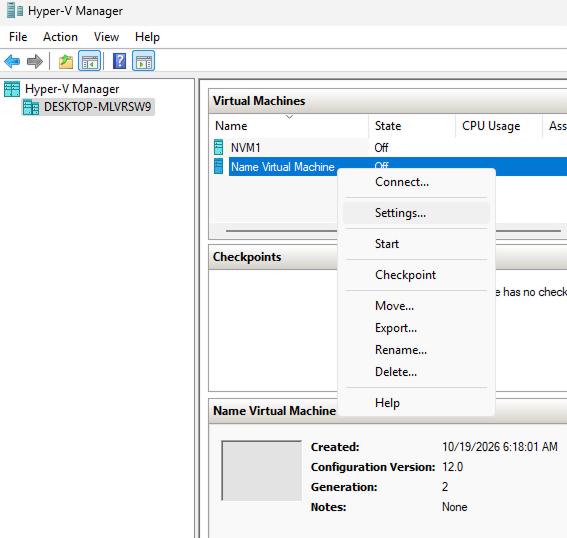
Right-click the newly created VM and select Settings...
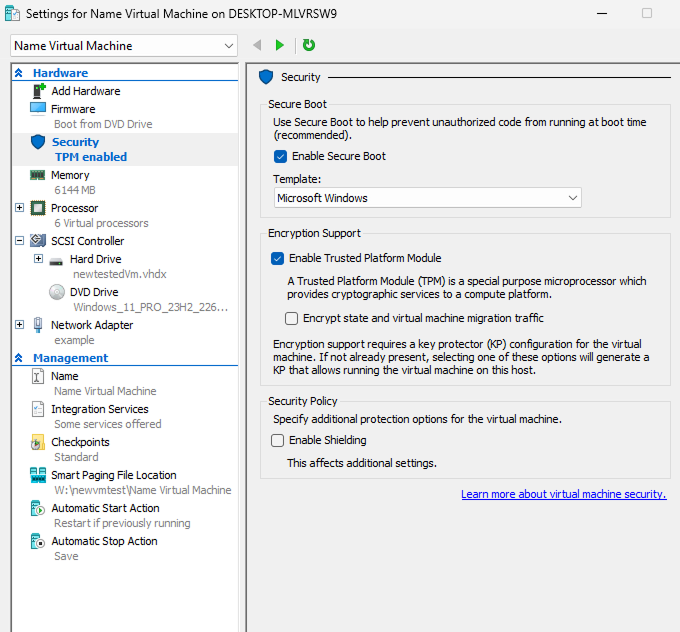
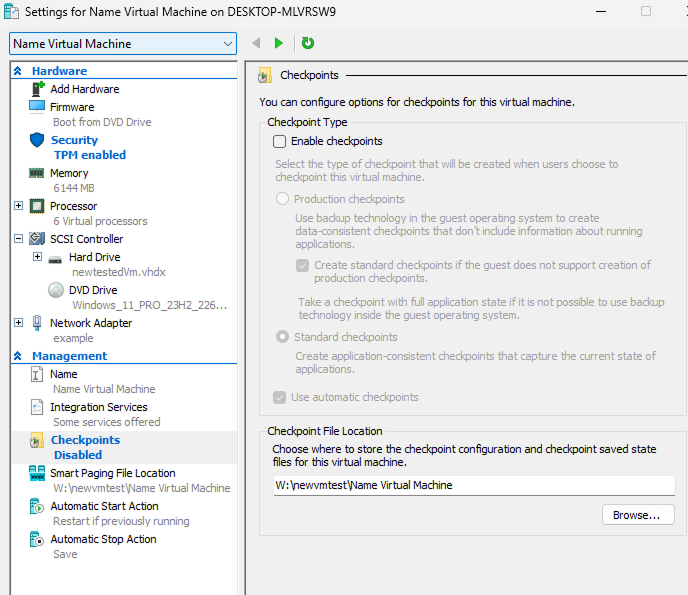
1. Enable TPM: Navigate to Security, check "Enable Trusted Platform Module", and click Apply.
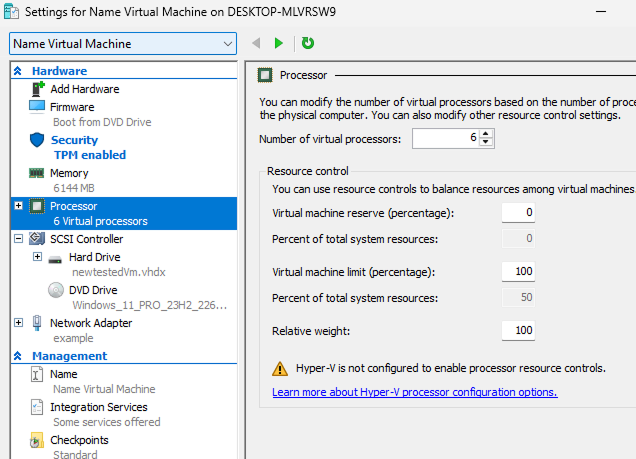
2. Allocate Virtual Processors: Go to Processor, set Number of virtual processors to at least 6, and click Apply.
3. Disable Checkpoints: Go to Checkpoints, uncheck "Enable checkpoints", then click Apply and OK. Checkpoints consume excessive disk space and degrade disk I/O performance.
04 Installing Windows 11 on the VM
Boot the VM and deploy the optimized lightweight Windows 11 Pro Superlite edition.
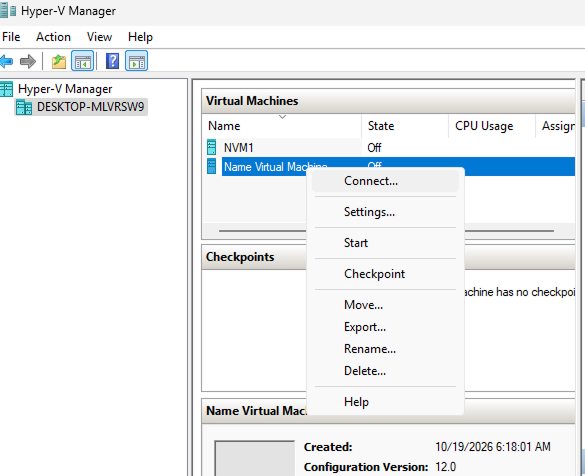
Right-click the VM in Hyper-V Manager and select Connect...
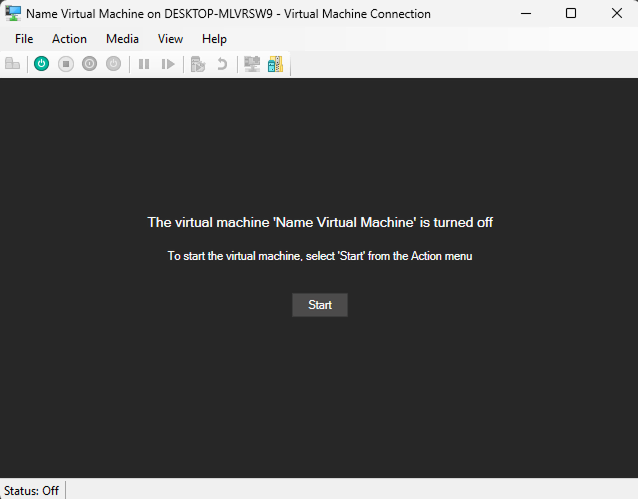
In the Virtual Machine Connection window, click the green Start button.
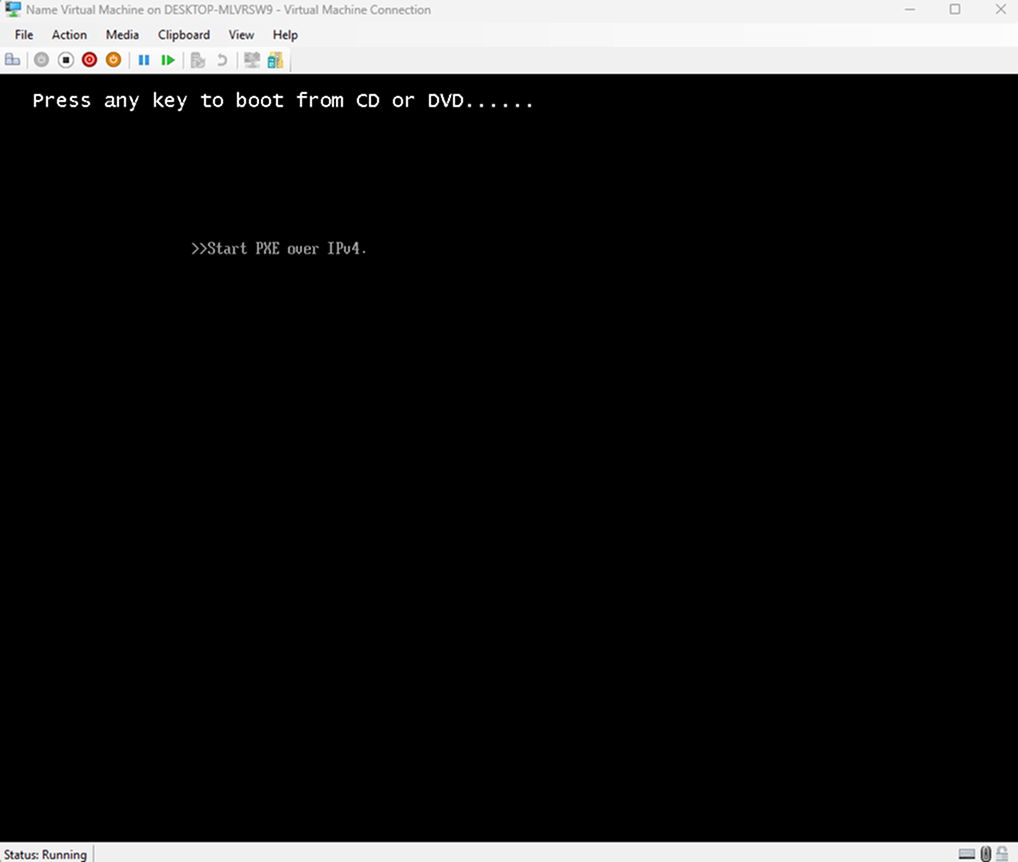
As soon as the black console appears, promptly press any key on your keyboard to boot from the virtual installation media.
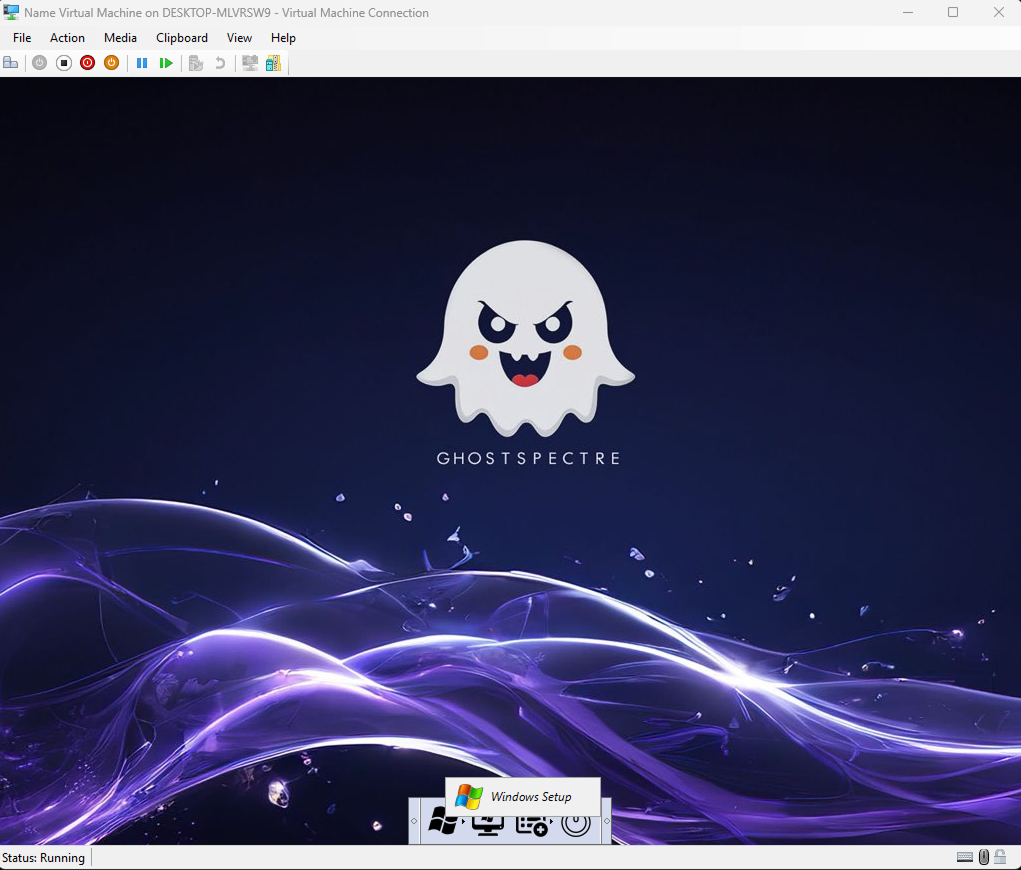
On the Ghost Spectre desktop, click the Windows Setup icon located at the bottom dock.
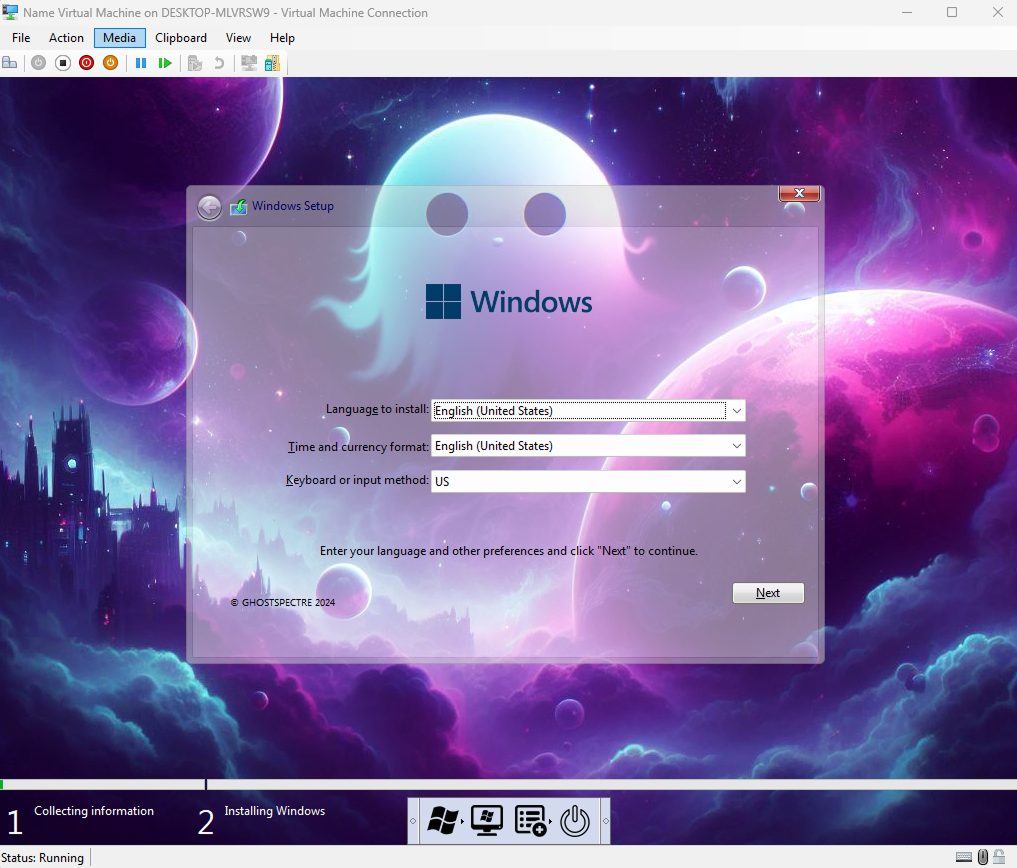
Set Language to install, Time and currency format, and Keyboard input method to English (United States). Click Next.
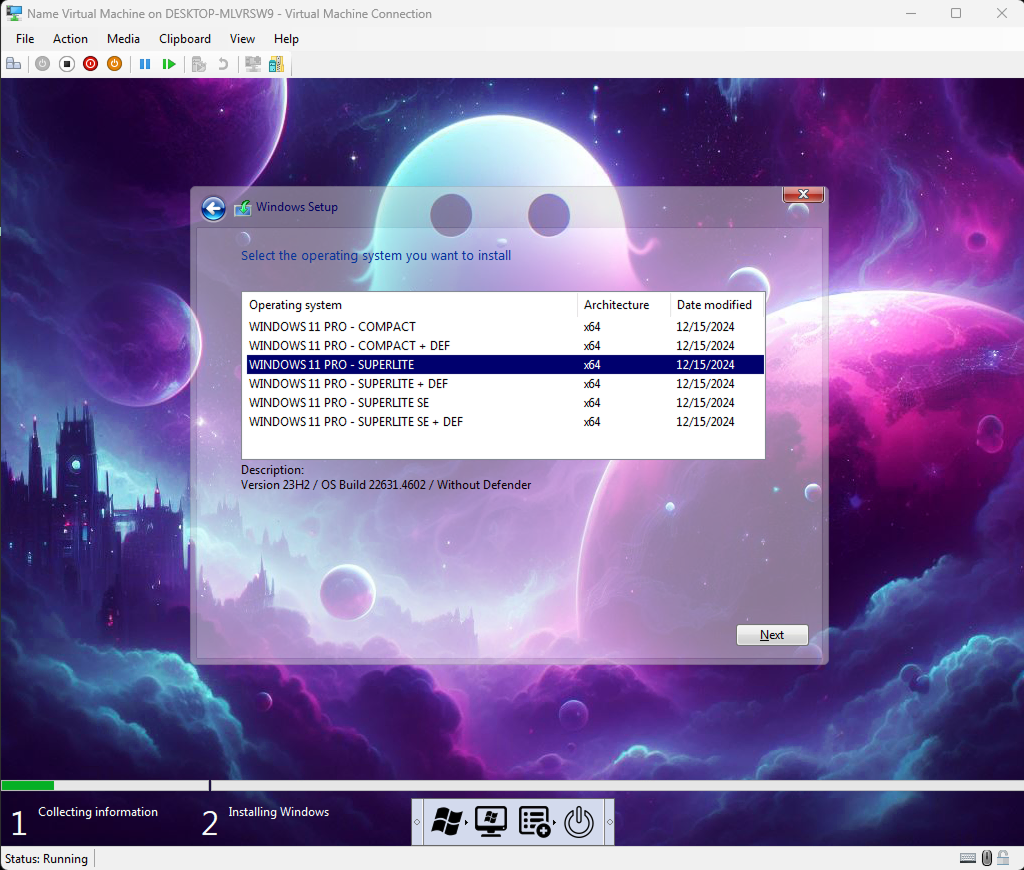
From the operating system selection list, highlight WINDOWS 11 PRO - SUPERLITE (Without Defender / optimized build). Click Next.
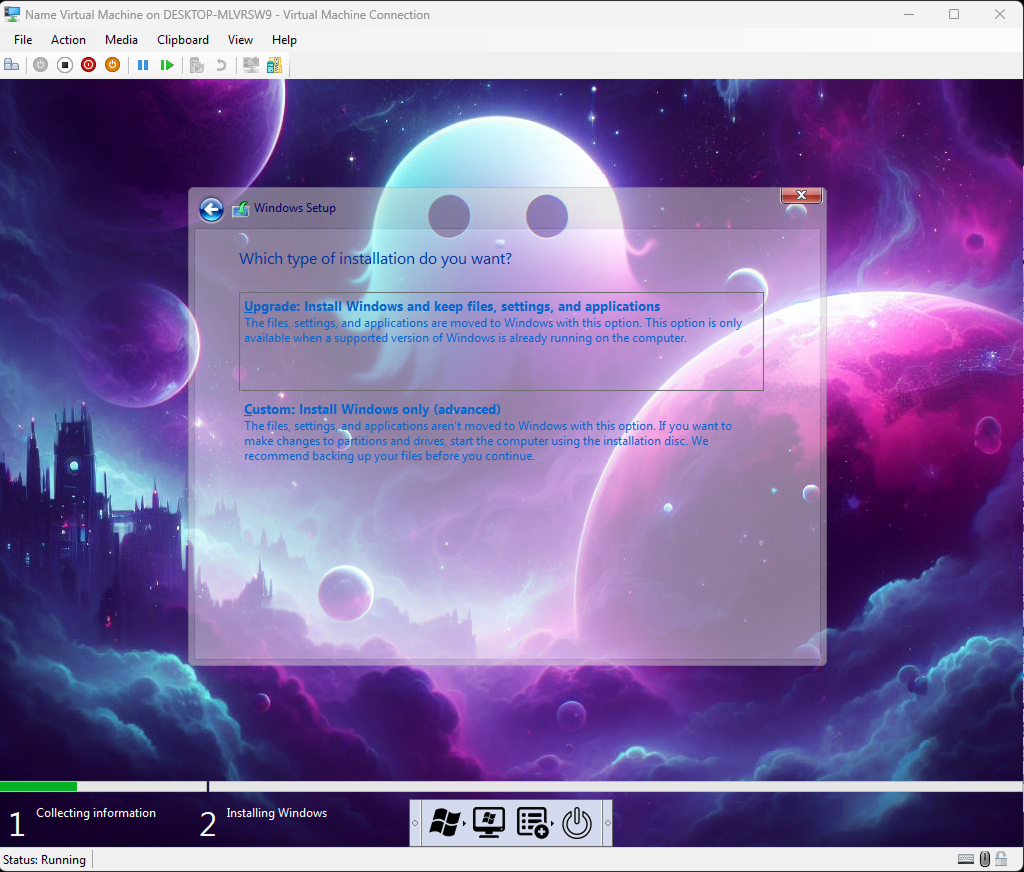
Choose Custom: Install Windows only (advanced), select the unallocated 100 GB virtual drive, and click Next.
05 GPU Partitioning (GPU-PV) & Driver Passthrough
GPU Partitioning (GPU-PV) shares slices of your physical host graphics card with the virtual machine, unlocking DirectX 12 hardware acceleration essential for Counter-Strike 2.
On your Host PC, search for Windows PowerShell, right-click, and select Run as Administrator.
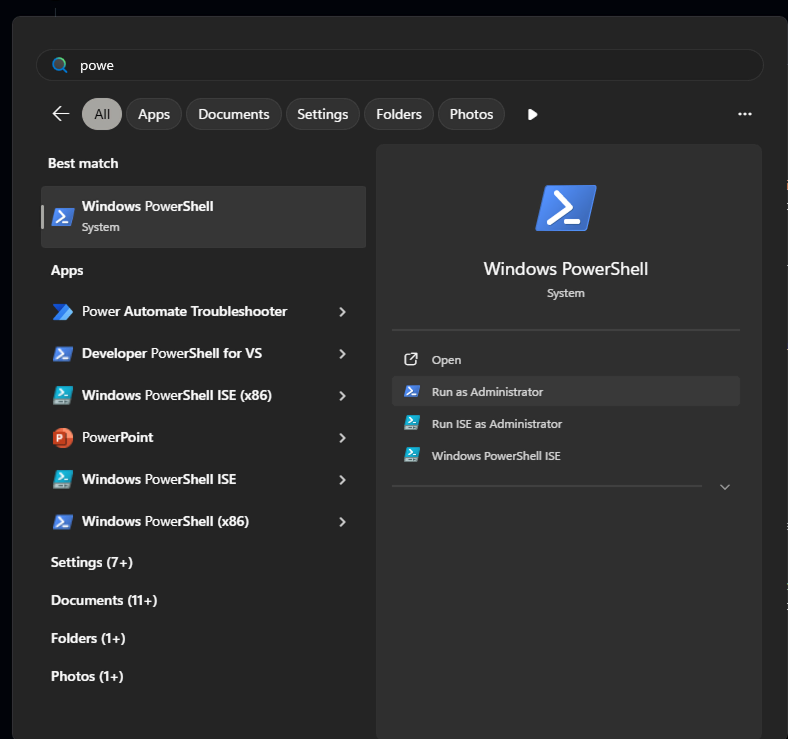
Make sure your VM is running. In the PowerShell console, paste the script below. Only change the name in the first line of the code: replace "Name Virtual Machine" in line 1 with your exact VM name, leaving everything else untouched.
$vm = "Name Virtual Machine"
$systemPath = "C:\Windows\System32\"
$driverPath = "C:\Windows\System32\DriverStore\FileRepository\"

# check if script is admin
$currentPrincipal = New-Object Security.Principal.WindowsPrincipal([Security.Principal.WindowsIdentity]::GetCurrent())
if( $currentPrincipal.IsInRole([Security.Principal.WindowsBuiltInRole]::Administrator) ) {

    # Enable guest integration services
    Get-VM -Name $vm | Get-VMIntegrationService | ? {-not($_.Enabled)} | Enable-VMIntegrationService -Verbose

    # Locate NVIDIA / GPU display driver repository folder
    $localDriverFolder = ""
    Get-ChildItem $driverPath -recurse | Where-Object {$_.PSIsContainer -eq $true -and $_.Name -match "nv_dispi.inf_amd64_*"} | Sort-Object -Descending -Property LastWriteTime | select -First 1 |
    ForEach-Object {
        if ($localDriverFolder -eq "") {
            $localDriverFolder = $_.Name
        }
    }

    Write-Host "Driver Repository: $localDriverFolder"

    # Copy driver repository files into VM C:\Temp\System32\HostDriverStore
    Get-ChildItem $driverPath$localDriverFolder -recurse | Where-Object {$_.PSIsContainer -eq $false} |
    Foreach-Object {
        $sourcePath = $_.FullName
        $destinationPath = $sourcePath -replace "^C\:\\Windows\\System32\\DriverStore\\","C:\Temp\System32\HostDriverStore\"
        Copy-VMFile $vm -SourcePath $sourcePath -DestinationPath $destinationPath -Force -CreateFullPath -FileSource Host
    }

    # Copy NVIDIA System32 binaries into VM C:\Temp\System32
    Get-ChildItem $systemPath | Where-Object {$_.Name -like "NV*"} |
    ForEach-Object {
        $sourcePath = $_.FullName
        $destinationPath = $sourcePath -replace "^C\:\\Windows\\System32\\","C:\Temp\System32\"
        Copy-VMFile $vm -SourcePath $sourcePath -DestinationPath $destinationPath -Force -CreateFullPath -FileSource Host
    }

    Write-Host "Success! Please go to C:\Temp and copy the files where they are expected within the VM."

} else {
    Write-Host "This PowerShell Script must be run with Administrative Privileges."
}
Upon completion, the terminal displays the confirmation output: Success! Please go to C:\Temp...

Switch to the VM desktop:
- Open File Explorer and navigate to
C:\Temp\System32. - Copy all files and folders (including
HostDriverStoreand allnv*.*files). - Paste them directly into
C:\Windows\System32(replace any existing files if prompted).
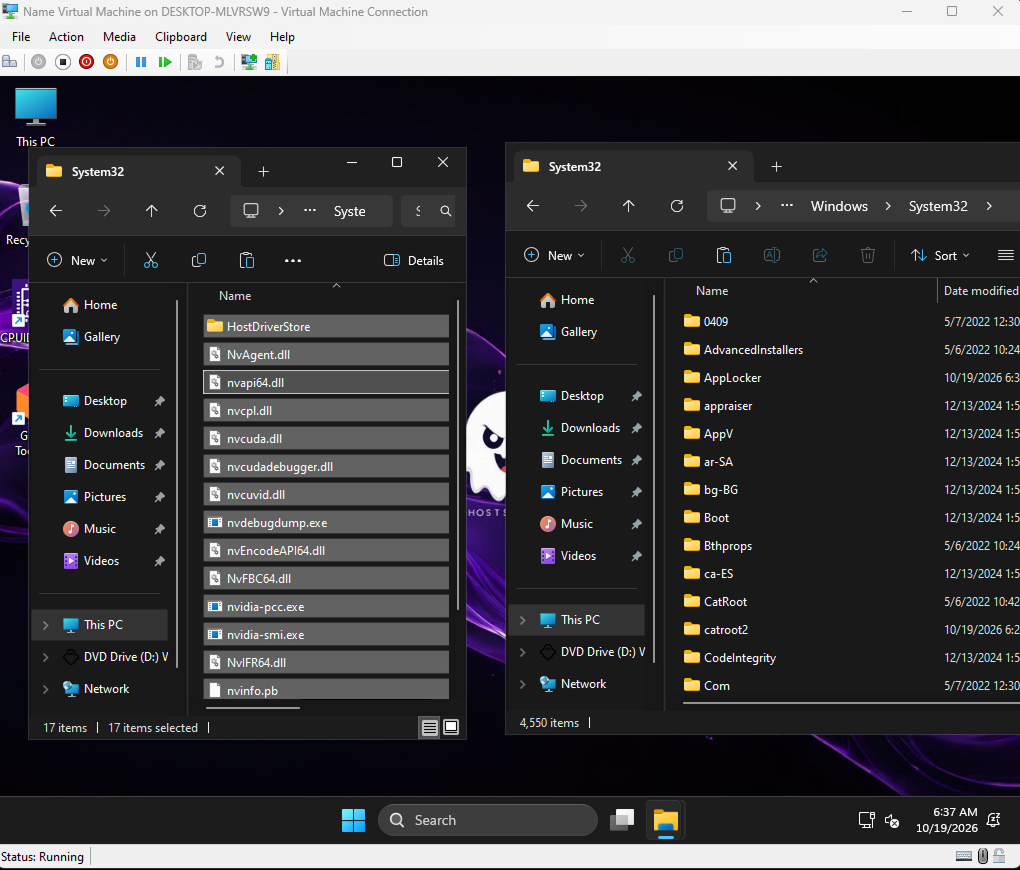
State: Off) before proceeding to Step 04.
On your Host PC, right-click the VM in Hyper-V Manager > Settings... > Integration Services.
Uncheck "Guest services", then click Apply and OK.
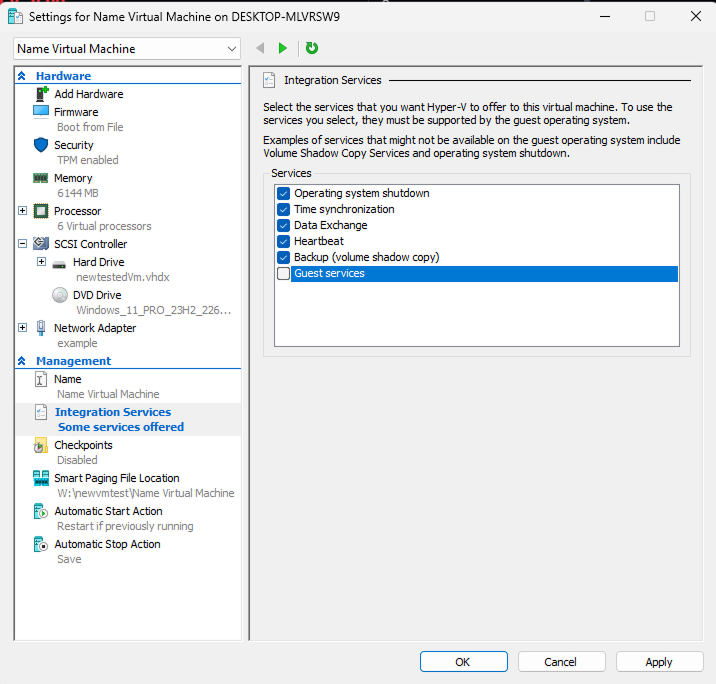
In Host Administrator PowerShell, execute the following partition binding script (only change the name in the first line of the code to match your exact VM name):
$vm = "Name Virtual Machine"
if (Get-VMGpuPartitionAdapter -VMName $vm -ErrorAction SilentlyContinue) {
   Remove-VMGpuPartitionAdapter -VMName $vm
}
Set-VM -GuestControlledCacheTypes $true -VMName $vm
Set-VM -LowMemoryMappedIoSpace 1Gb -VMName $vm
Set-VM -HighMemoryMappedIoSpace 32Gb -VMName $vm
Add-VMGpuPartitionAdapter -VMName $vm
Start the VM. Inside the VM, search for Device Manager > Display adapters. Your physical graphics card (e.g. NVIDIA GeForce RTX) should be listed with operational drivers!
06 System Optimization & Tuning
Perform these three critical tuning operations inside the VM to prevent game de-syncs, micro-stutters, and idle sleep.
Right-click the clock in the bottom right corner of the VM desktop > Adjust date and time. Under Additional settings, click Sync now. Correct clock time prevents Steam Guard certificate mismatch errors.
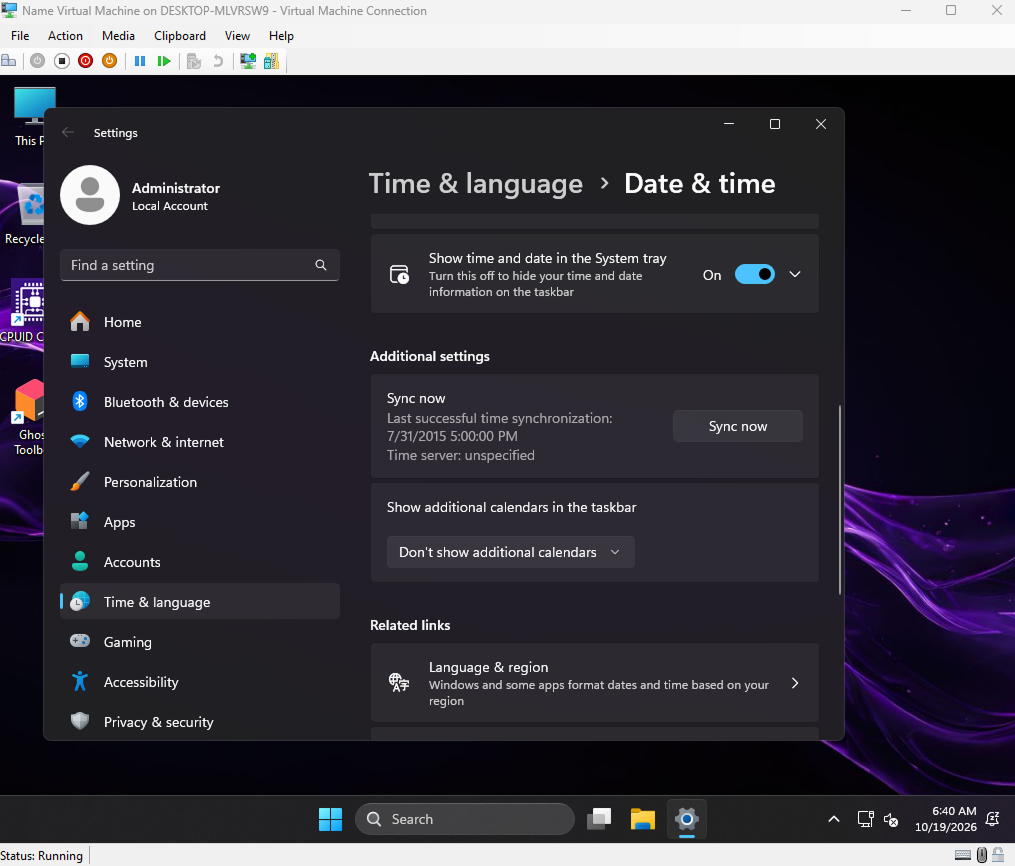
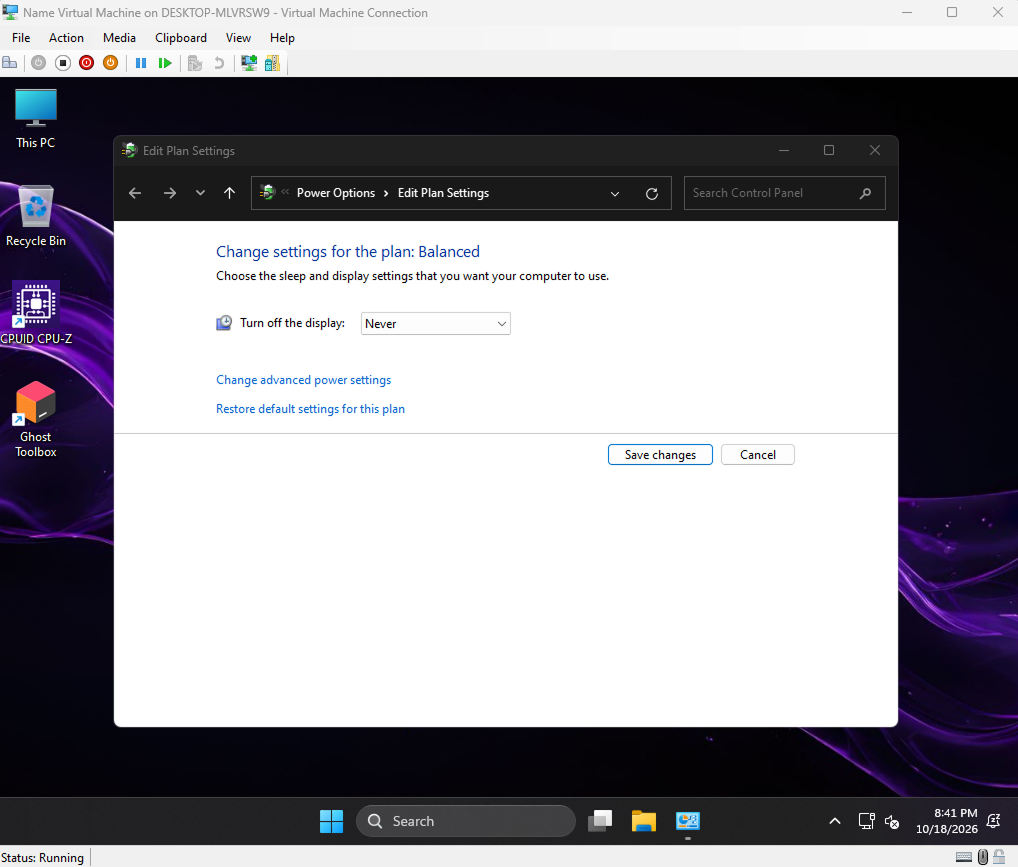
Press Win + S, search for Edit power plan, set Turn off the display: Never, and click Save changes.
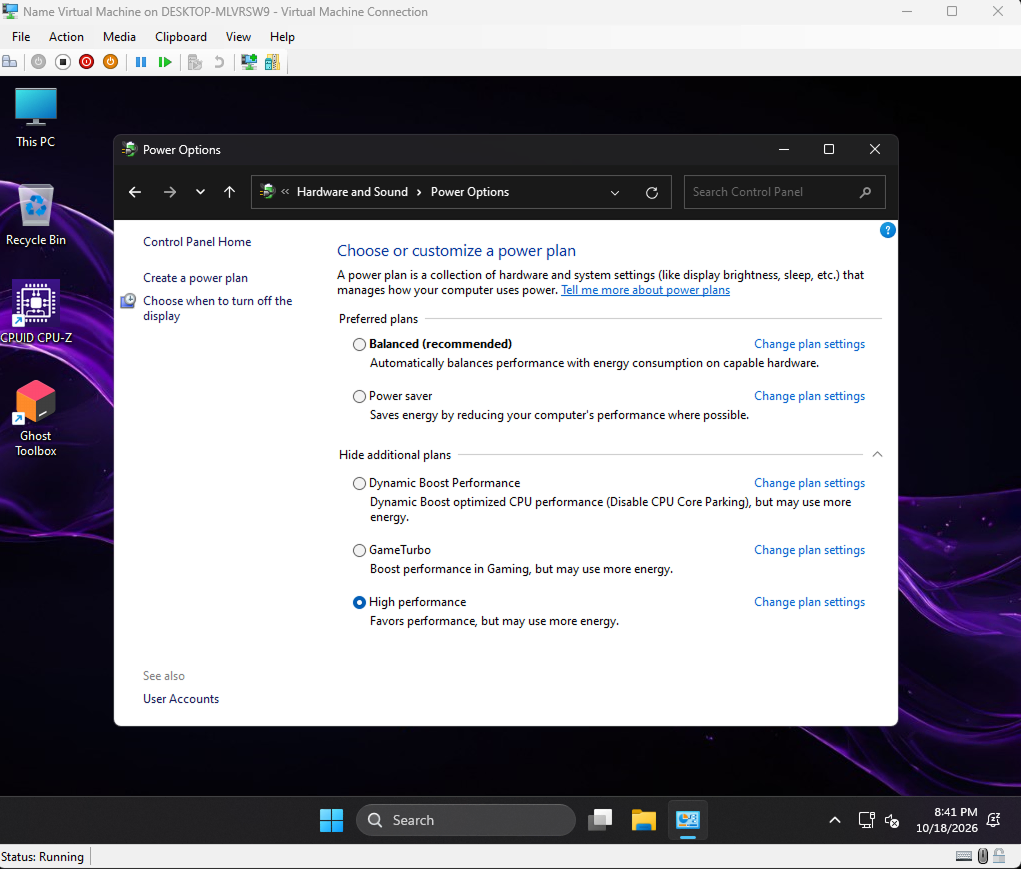
In the Power Options window, expand additional plans and select High performance. This prevents CPU core parking and keeps GPU clock states elevated.
07 Transferring Data to the VM (VHDX Direct Mounting)
The fastest and cleanest method to transfer large game files (CS2, Steam), tools, and VPN software into your virtual machine without network bottlenecks or session limits is mounting its virtual disk directly on the Host PC.
Ensure the VM is completely powered off (State: Off in Hyper-V Manager) before mounting its virtual disk.
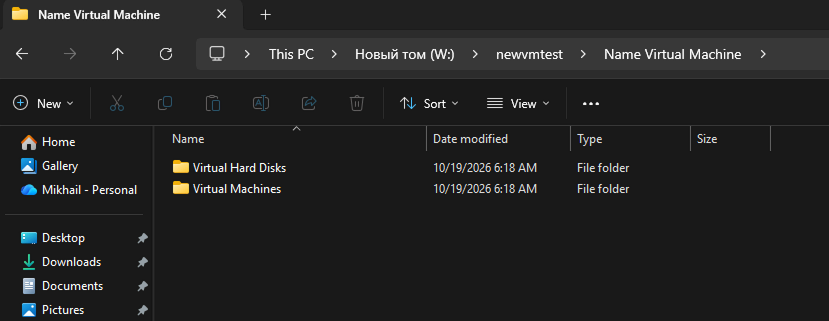
On your Host PC, open File Explorer and navigate to the directory chosen during the Specify Name and Storage Location step (e.g. W:\newvmtest\Name Virtual Machine).
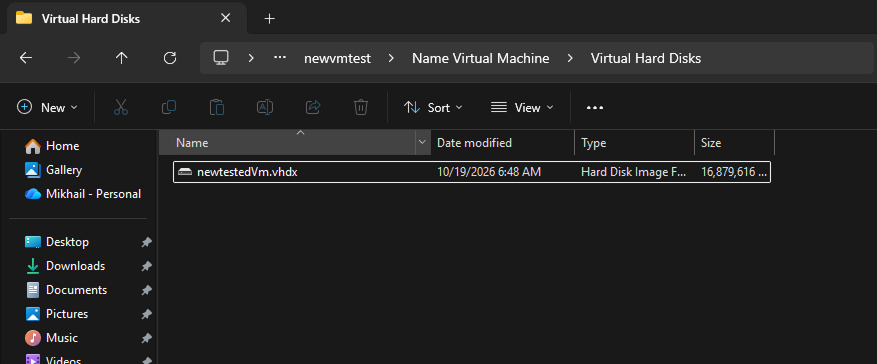
Open the Virtual Hard Disks folder, then double-click (or right-click > Mount) the virtual disk file: newtestedVm.vhdx.
Windows will instantly attach the virtual disk as a regular local drive under This PC (e.g. Local Disk (D:) or the next available drive letter).
You can now copy everything needed directly into this newly mounted disk at full NVMe read/write speeds:
- Steam & Counter-Strike 2 (copy your existing game library directly to skip downloading ~85 GB!)
- Panel software & dependencies
- VPN clients & proxy tools
- Any custom configs or scripts
Once file transfer finishes, open This PC on your host, right-click the mounted virtual disk (Local Disk (D:)), and select Eject.
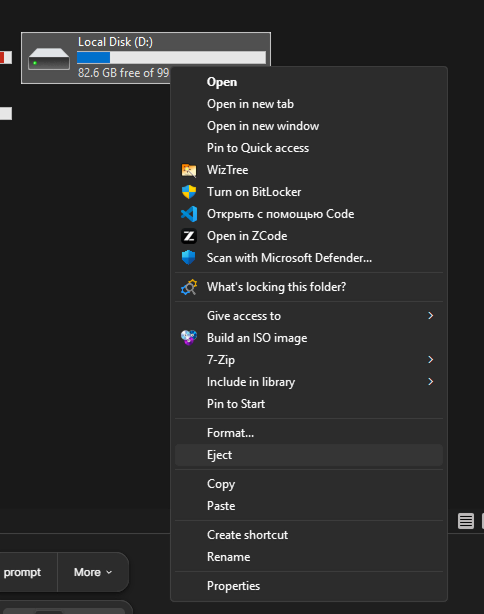
Once ejected, power on your VM in Hyper-V Manager. All copied games and software are immediately available inside the VM's file system!
FIX Troubleshooting: No Internet in VM
If the virtual machine indicates "No Internet access" through the virtual switch, follow this 5-step network reset sequence:
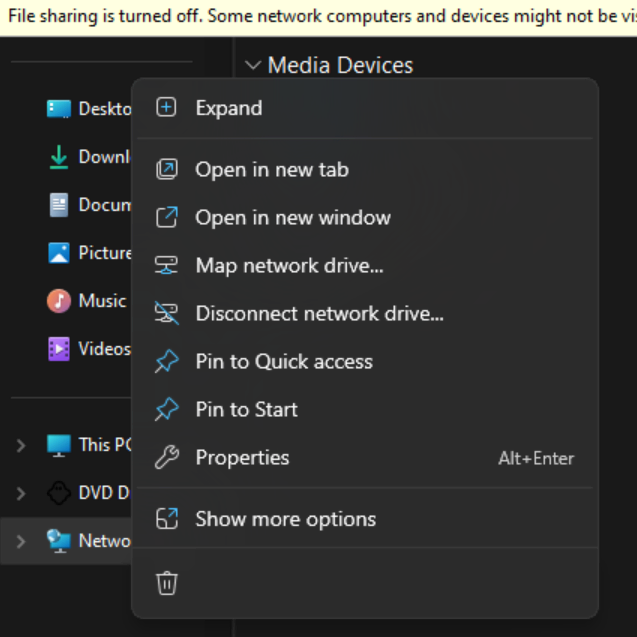
Inside VM: Open File Explorer, right-click Network > Properties, and click Change adapter settings on the left.
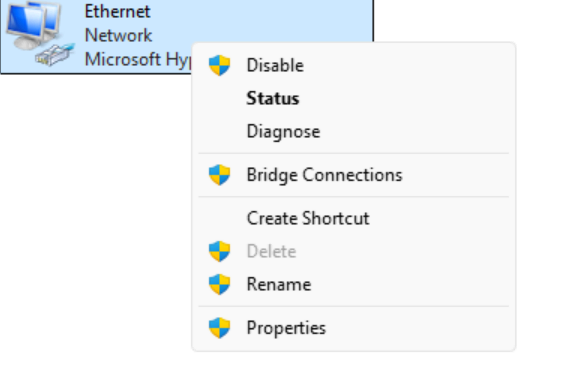
Right-click the Ethernet adapter, click Disable, wait 5 seconds, then right-click and click Enable.
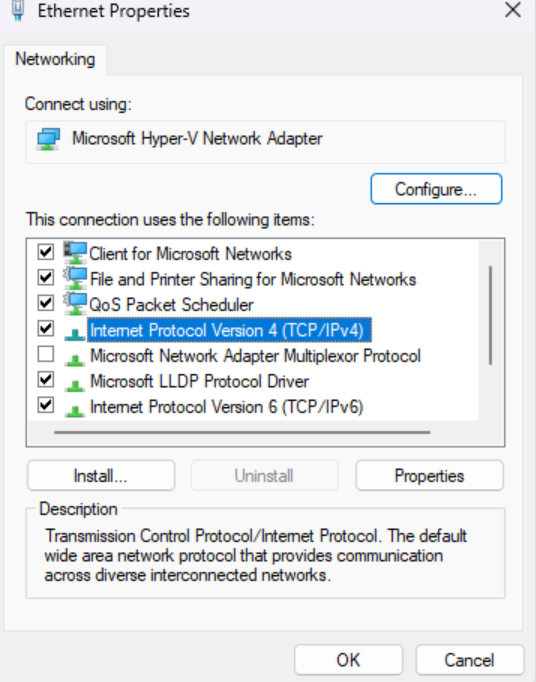
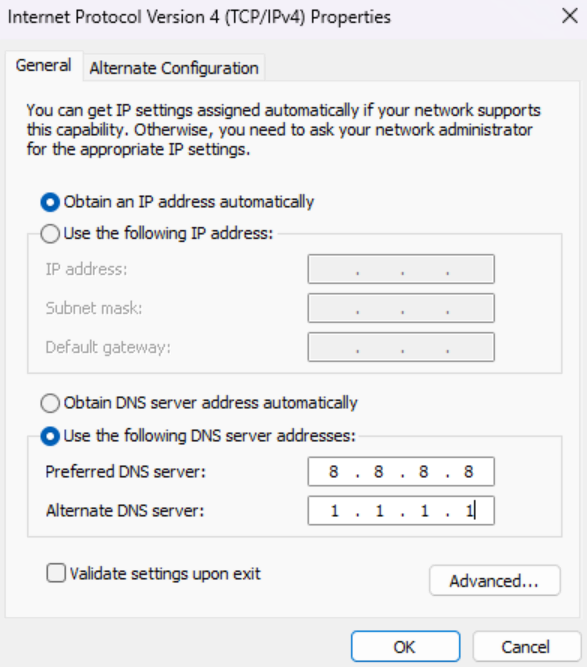
Right-click Ethernet > Properties > select Internet Protocol Version 4 (TCP/IPv4) > click Properties.
Select "Use the following DNS server addresses" and enter Google Public DNS:
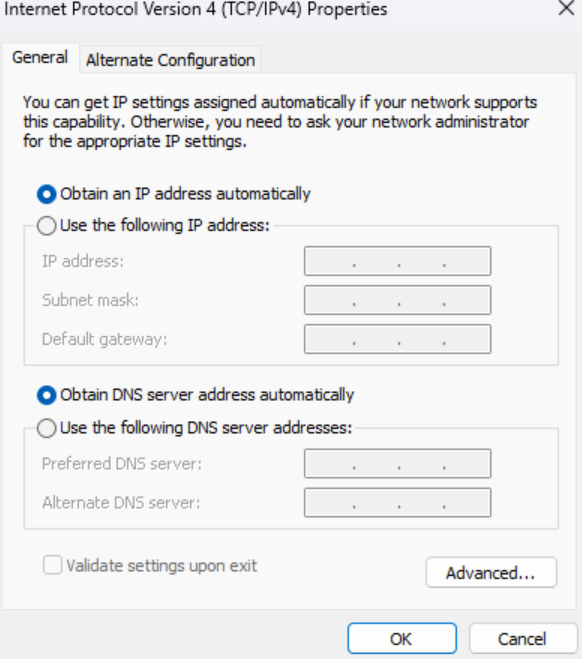
If manual DNS fails to resolve gateway routes, switch back to "Obtain DNS server address automatically", click OK, and cycle the adapter once more.
SDA Steam Desktop Authenticator (SDA) Guide
Steam Desktop Authenticator (SDA) replaces physical mobile Steam Guard authenticators, enabling auto-confirmation of trade offers, item market listings, and multi-account 2FA logins without physical phone numbers.
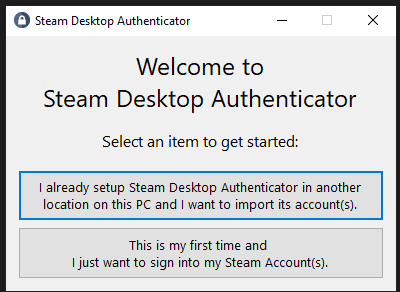
Upon launching SDA for the first time, select the second option: This is my first time and i just want to sign into my Steam Account(s).
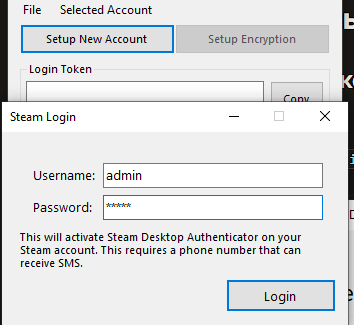
Click Setup New Account, enter your Steam account username and password, and click Login.
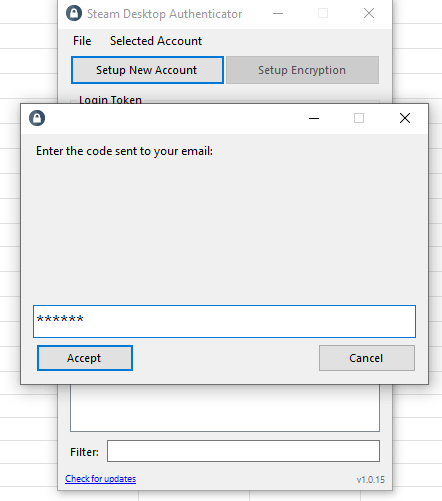
Retrieve the verification code sent to your registered Steam email address, enter it into the prompt, and click Accept.
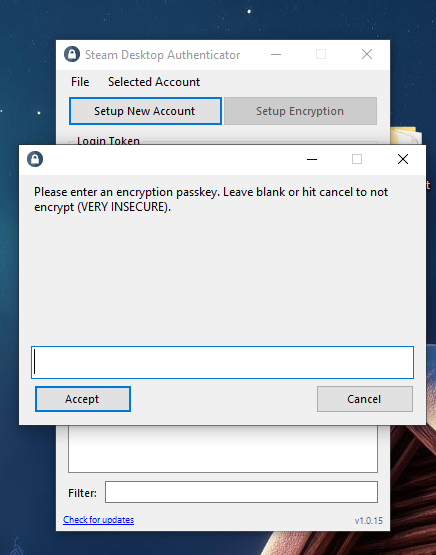
When asked to create an encryption password for your .maFile, leave the fields blank (or specify your master password) and click Accept.
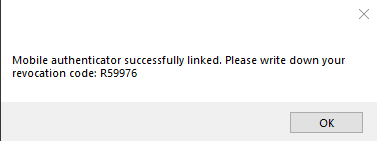
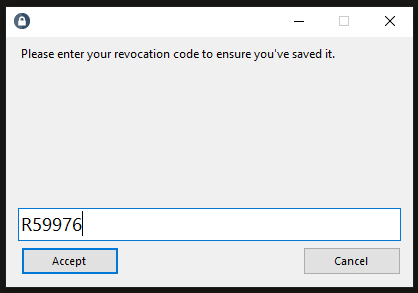
R59976). This key is mandatory for account recovery if you lose access to SDA!
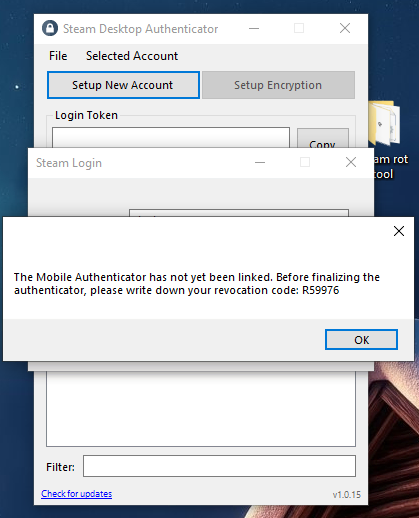
Click OK once safely backed up.
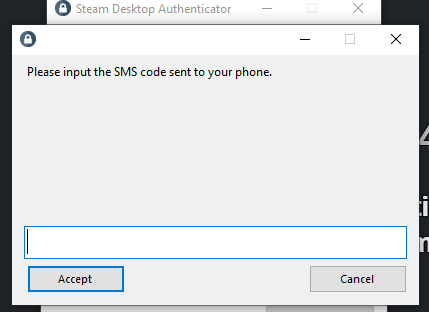
Enter the second verification code sent to your email and click Accept. Next, input your saved R-Code to confirm ownership and finalize binding.
Your account is now linked to Steam Desktop Authenticator. SDA will now auto-generate login 2FA tokens and automatically confirm trade drop offers.